14 Modify model inputs
In this chapter, you will learn how modify the model inputs.
14.1 Prerequisites
In this chapter, we will use the eplusr package to query and modify various inputs in an EnergyPlus model. We will also combine what you have learned about data manipulation (with the tidyverse package) to make it easier to work with the simulation inputs.
We will be working with the IDF and EPW file that pertains to the U.S. Department of Energy (DOE) Commercial Reference Building and Chicago’s TMY3 respectively.
14.2 Extract and Modify
Changing the values of the existing objects in the model is an important functionality in the application of data exploration and data science to EnergyPlus. There are many approaches to extract and modify an EnergyPlus model using eplusr. In this chapter we focus on
Directly extracting and modifying the field values of a single object using the
[[or$operator.Extracting and modifying multiple objects using the methods in the
Idfclass. Type?Idfin your console to see theIdfclass methods.
14.2.1 Single object
Like how you can access the field values of the model using the $ operator,
you can likewise modify them simply by accessing and then replace the current
value by assigning a different value. For instance, you can change the
Thermal Resistance field value of the CP02 CARPET PAD object to 0.5 using
the <- operator to assign 0.5 to the field Thermal Resistance.
model$`Material:NoMass`$`CP02 CARPET PAD`$`Thermal Resistance` <- 0.5
model$`Material:NoMass`$`CP02 CARPET PAD`
## <IdfObject: 'Material:NoMass'> [ID:56] `CP02 CARPET PAD`
## Class: <Material:NoMass>
## ├─ 1*: "CP02 CARPET PAD", !- Name
## │─ 2*: "VeryRough",       !- Roughness
## │─ 3*: 0.5,               !- Thermal Resistance {m2-K/W}
## │─ 4 : 0.9,               !- Thermal Absorptance
## │─ 5 : 0.7,               !- Solar Absorptance
## └─ 6 : 0.8;               !- Visible Absorptance
Another example showing how you can modify the lighting power density (field
name: Watts_per_Zone_Floor_Area) of a particular zone (object name:
Perimeter_bot_ZN_1_Lights) from 10.76 (current value) to 15 (new value).
Existing field values of the object Perimeter_bot_ZN_1_Lights, an instance of
the Lights class.
model$Lights$Perimeter_bot_ZN_1_Lights
## <IdfObject: 'Lights'> [ID:240] `Perimeter_bot_ZN_1_Lights`
## Class: <Lights>
## ├─ 01*: "Perimeter_bot_ZN_1_Lights",  !- Name
## │─ 02*: "Perimeter_bot_ZN_1",  !- Zone or ZoneList Name
## │─ 03*: "BLDG_LIGHT_SCH",   !- Schedule Name
## │─ 04 : "Watts/Area",       !- Design Level Calculation Method
## │─ 05 : <Blank>,            !- Lighting Level {W}
## │─ 06 : 10.76,              !- Watts per Zone Floor Area {W/m2}
## │─ 07 : <Blank>,            !- Watts per Person {W/person}
## │─ 08 : 0.4,                !- Return Air Fraction
....
Changing the value of the field Watts_per_Zone_Floor_Area from it’s existing
value of 10.76 to 15.
model$Lights$Perimeter_bot_ZN_1_Lights$Watts_per_Zone_Floor_Area <- 15
model$Lights$Perimeter_bot_ZN_1_Lights
## <IdfObject: 'Lights'> [ID:240] `Perimeter_bot_ZN_1_Lights`
## Class: <Lights>
## ├─ 01*: "Perimeter_bot_ZN_1_Lights",  !- Name
## │─ 02*: "Perimeter_bot_ZN_1",  !- Zone or ZoneList Name
## │─ 03*: "BLDG_LIGHT_SCH",   !- Schedule Name
## │─ 04 : "Watts/Area",       !- Design Level Calculation Method
## │─ 05 : <Blank>,            !- Lighting Level {W}
## │─ 06 : 15,                 !- Watts per Zone Floor Area {W/m2}
## │─ 07 : <Blank>,            !- Watts per Person {W/person}
## │─ 08 : 0.4,                !- Return Air Fraction
....
14.2.2 Multiple objects
Methods to extract data:
| Methods | Description |
|---|---|
$to_table() |
Extract specified objects of the model to data.frames |
$to_string() |
Extract specified objects of the model to strings |
You can extract the EnergyPlus objects of interest into a R data frame using the
$to_table method in the Idf class. If no arguments are provided to the
method, the entire EnergyPlus model is converted to a data frame.
The data frame consists of the following six columns.
- id (integer): Integer identifiers of the EnergyPlus objects.
- name (character): Names of the EnergyPlus objects.
- class (character): The class that the EnergyPlus object belongs to.
- index (integer): Row index for the field of a particular EnergyPlus object.
- field (character): The name of the column within a table that the observation belongs to.
- value (character): The value of the field.
Take a minute now to open the EnergyPlus IDF file
("RefBldgMediumOfficeNew2004_Chicago.idf"). Compare the text file with the
data frame below, and identify where the values for the columns class, name,
and field would correspond to in the IDF text file. You will also notice that
some of the EnergyPlus classes such as Version and SimulationControl do not
have a name field, which explains why it is stored as NA in the data frame.
model$to_table()
##        id name             class index
##    1:   1 <NA>           Version     1
##    2:   2 <NA> SimulationControl     1
##    3:   2 <NA> SimulationControl     2
##    4:   2 <NA> SimulationControl     3
##    5:   2 <NA> SimulationControl     4
##   ---
## 7839: 681 <NA>       FuelFactors    32
## 7840: 681 <NA>       FuelFactors    33
## 7841: 681 <NA>       FuelFactors    34
....- Subset by Class
Working with the entire model can be difficult due to the large number of rows.
You can extract all the objects belonging to a class by supplying a character
vector of class names that are of interest to the argument class.
model$to_table(class = c("Construction", "Lights"))
##       id                         name        class index
##   1:  37 Steel Frame Non-res Ext Wall Construction     1
##   2:  37 Steel Frame Non-res Ext Wall Construction     2
##   3:  37 Steel Frame Non-res Ext Wall Construction     3
##   4:  37 Steel Frame Non-res Ext Wall Construction     4
##   5:  39            IEAD Non-res Roof Construction     1
##  ---
## 217: 251    Perimeter_top_ZN_4_Lights       Lights     9
## 218: 251    Perimeter_top_ZN_4_Lights       Lights    10
## 219: 251    Perimeter_top_ZN_4_Lights       Lights    11
....
You can also extract particular objects from different classes by supplying a
character vector of object names to the argument which.
model$to_table(which = c(
    "Wood Siding",
    "Steel Frame NonRes Wall Insulation",
    "1/2IN Gypsum"
))
##     id                               name    class index               field
##  1: 50                        Wood Siding Material     1                Name
##  2: 50                        Wood Siding Material     2           Roughness
##  3: 50                        Wood Siding Material     3           Thickness
##  4: 50                        Wood Siding Material     4        Conductivity
##  5: 50                        Wood Siding Material     5             Density
##  6: 50                        Wood Siding Material     6       Specific Heat
##  7: 50                        Wood Siding Material     7 Thermal Absorptance
##  8: 50                        Wood Siding Material     8   Solar Absorptance
##  9: 50                        Wood Siding Material     9 Visible Absorptance
....

model$to_table(which = c("Perimeter_bot_ZN_1_Lights"))
##      id                      name  class index
##  1: 240 Perimeter_bot_ZN_1_Lights Lights     1
##  2: 240 Perimeter_bot_ZN_1_Lights Lights     2
##  3: 240 Perimeter_bot_ZN_1_Lights Lights     3
##  4: 240 Perimeter_bot_ZN_1_Lights Lights     4
##  5: 240 Perimeter_bot_ZN_1_Lights Lights     5
##  6: 240 Perimeter_bot_ZN_1_Lights Lights     6
##  7: 240 Perimeter_bot_ZN_1_Lights Lights     7
##  8: 240 Perimeter_bot_ZN_1_Lights Lights     8
##  9: 240 Perimeter_bot_ZN_1_Lights Lights     9
....
Once the EnergyPlus objects are in a data.frame format, you can take advantage
of the tidyverse library to easily manipulate and modify their values. For
example, you can use the filter() function to subset the data frame to retain
rows of interest and the mutate() function to modify values within columns.
In the example below, we first extract all objects in the Lights class from
the EnergyPlus model. We then filter the data frame to contain only the field
"Watts per Zone Floor Area", which is used to specify the lighting power
density in \(W/m^2\) in EnergyPlus. Lastly, we change the lighting power density
of all the objects in the Lights class from \(10.76 \mathrm{W}/\mathrm{m}^2\) to
\(15 \mathrm{W}/\mathrm{m}^2\).
lights_df <- model$to_table(class = c("Lights")) %>%
    mutate(
        value = if_else(
            field == "Watts per Zone Floor Area", # condition
            "15", # value if TRUE
            value # value if FALSE
        )
    )

lights_df
##       id                      name  class index
##   1: 237        Core_bottom_Lights Lights     1
##   2: 237        Core_bottom_Lights Lights     2
##   3: 237        Core_bottom_Lights Lights     3
##   4: 237        Core_bottom_Lights Lights     4
##   5: 237        Core_bottom_Lights Lights     5
##  ---
## 191: 251 Perimeter_top_ZN_4_Lights Lights     9
## 192: 251 Perimeter_top_ZN_4_Lights Lights    10
## 193: 251 Perimeter_top_ZN_4_Lights Lights    11
....
However, notice that you are not modifying the model just by changing the values of the data frame. This is not surprising since the extracted data frame is a copy of the model and not the model itself.
model$`Lights`
## $Core_bottom_Lights
## <IdfObject: 'Lights'> [ID:237] `Core_bottom_Lights`
## ── COMMENTS ────────────────────────────────────────────────────────────────────
## ! ***LIGHTS***
## ── VALUES ──────────────────────────────────────────────────────────────────────
## Class: <Lights>
## ├─ 01*: "Core_bottom_Lights",  !- Name
## │─ 02*: "Core_bottom",      !- Zone or ZoneList Name
## │─ 03*: "BLDG_LIGHT_SCH",   !- Schedule Name
## │─ 04 : "Watts/Area",       !- Design Level Calculation Method
....
To modify the model, you need to use the $update() method in the Idf class,
which can take the modified data frame as an argument.
model$update(lights_df)
## $Core_bottom_Lights
## <IdfObject: 'Lights'> [ID:237] `Core_bottom_Lights`
## ── COMMENTS ────────────────────────────────────────────────────────────────────
## ! ***LIGHTS***
## ── VALUES ──────────────────────────────────────────────────────────────────────
## Class: <Lights>
## ├─ 01*: "Core_bottom_Lights",  !- Name
## │─ 02*: "Core_bottom",      !- Zone or ZoneList Name
## │─ 03*: "BLDG_LIGHT_SCH",   !- Schedule Name
## │─ 04 : "Watts/Area",       !- Design Level Calculation Method
....
model$`Lights`
## $Core_bottom_Lights
## <IdfObject: 'Lights'> [ID:237] `Core_bottom_Lights`
## ── COMMENTS ────────────────────────────────────────────────────────────────────
## ! ***LIGHTS***
## ── VALUES ──────────────────────────────────────────────────────────────────────
## Class: <Lights>
## ├─ 01*: "Core_bottom_Lights",  !- Name
## │─ 02*: "Core_bottom",      !- Zone or ZoneList Name
## │─ 03*: "BLDG_LIGHT_SCH",   !- Schedule Name
## │─ 04 : "Watts/Area",       !- Design Level Calculation Method
....- Subset by Objects
You can also extract data from the EnergyPlus model based on the object names by
supplying the object names to the argument which of the $to_table() method.
In the example that follows, we will show you how to do this by changing the
thermal properties of the external wall construction.
First, you can find out which Construction objects make up the external wall
by scanning objects from the BuildingSurface:Detailed class, which describes
all the surfaces of the model. In general, the external wall surfaces would be
those that are of Surface Type == Wall and
Outside Boundary Conditions == Outdoors (i.e., the surface is exposed to
outside temperature conditions). In this model, the external wall is made up of
the Steel Frame Non-res Ext Wall object of the Construction class.
ext_wall_surf <- model$to_table(class = c("BuildingSurface:Detailed"), wide = TRUE) %>%
    filter(`Surface Type` == "Wall", `Outside Boundary Condition` == "Outdoors")

unique(ext_wall_surf$`Construction Name`)
## [1] "Steel Frame Non-res Ext Wall"
The object Steel Frame Non-res Ext Wall comprises of three materials
(Wood Siding, Steel Frame NonRes Wall Insulation, and 1/2IN Gypsum) that
are modeled using the class Material. To modify the thermal properties of the
external wall, you would need to modify the inputs of either of these three
materials.
model$object_relation("Steel Frame Non-res Ext Wall")
## ── Refer to Others ─────────────────────────────────────────────────────────────
##  Class: <Construction>
##  └─ Object [ID:37] <Steel Frame Non-res Ext Wall>
##     ├─ 2: "Wood Siding", !- Outside Layer
##     │  v~~~~~~~~~~~~~~~~~~~~~~~~~~~~~~~~~
##     │  └─ Class: <Material>
##     │     └─ Object [ID:50] <Wood Siding>
##     │        └─ 1: "Wood Siding"; !- Name
##     │
##     ├─ 3: "Steel Frame NonRes Wall Insulation",  !- Layer 2
....
We first extract these three materials from the model.
ext_wall_mat <- model$to_table(which = c(
    "Wood Siding",
    "Steel Frame NonRes Wall Insulation",
    "1/2IN Gypsum"
))
ext_wall_mat
##     id                               name    class index               field
##  1: 50                        Wood Siding Material     1                Name
##  2: 50                        Wood Siding Material     2           Roughness
##  3: 50                        Wood Siding Material     3           Thickness
##  4: 50                        Wood Siding Material     4        Conductivity
##  5: 50                        Wood Siding Material     5             Density
##  6: 50                        Wood Siding Material     6       Specific Heat
##  7: 50                        Wood Siding Material     7 Thermal Absorptance
##  8: 50                        Wood Siding Material     8   Solar Absorptance
##  9: 50                        Wood Siding Material     9 Visible Absorptance
....
You can then modify the extracted information in the data.frame. Here, we
increase the Conductivity of the 1/2IN Gypsum from 0.16 to 0.20, and
double the Thickness of the wall insultion
(Steel Frame NonRes Wall Insulation).
ext_wall_mat[name == "1/2IN Gypsum" & field == "Conductivity"]$value <- "0.20"

ext_wall_mat[name == "Steel Frame NonRes Wall Insulation" &
    field == "Thickness"]$value <- "0.174"
Subsequently, you can update the model using the modified data.frame with the
$update() method in the Idf class.
model$update(ext_wall_mat)
## $`Wood Siding`
## <IdfObject: 'Material'> [ID:50] `Wood Siding`
## Class: <Material>
## ├─ 1*: "Wood Siding",  !- Name
## │─ 2*: "MediumSmooth", !- Roughness
## │─ 3*: 0.01,           !- Thickness {m}
## │─ 4*: 0.11,           !- Conductivity {W/m-K}
## │─ 5*: 544.62,         !- Density {kg/m3}
## │─ 6*: 1210,           !- Specific Heat {J/kg-K}
## │─ 7 : 0.9,            !- Thermal Absorptance
....

model$Material$`1/2IN Gypsum`
## <IdfObject: 'Material'> [ID:51] `1/2IN Gypsum`
## Class: <Material>
## ├─ 1*: "1/2IN Gypsum", !- Name
## │─ 2*: "Smooth",       !- Roughness
## │─ 3*: 0.0127,         !- Thickness {m}
## │─ 4*: 0.2,            !- Conductivity {W/m-K}
## │─ 5*: 784.9,          !- Density {kg/m3}
## │─ 6*: 830,            !- Specific Heat {J/kg-K}
## │─ 7 : 0.9,            !- Thermal Absorptance
## │─ 8 : 0.92,           !- Solar Absorptance
....

model$Material$`Steel Frame NonRes Wall Insulation`
## <IdfObject: 'Material'> [ID:38] `Steel Frame NonRes Wall Insulation`
## Class: <Material>
## ├─ 1*: "Steel Frame NonRes Wall Insulation",  !- Name
## │─ 2*: "MediumRough",      !- Roughness
## │─ 3*: 0.174,              !- Thickness {m}
## │─ 4*: 0.049,              !- Conductivity {W/m-K}
## │─ 5*: 265,                !- Density {kg/m3}
## │─ 6*: 836.8,              !- Specific Heat {J/kg-K}
## │─ 7 : 0.9,                !- Thermal Absorptance
## │─ 8 : 0.7,                !- Solar Absorptance
....
14.3 Create new objects
14.3.1 add
You can add new objects to the model using the $add() method in the Idf
class. The $add() method takes as it’s first argument is a nested named list
of the form. Note that <CLASS NAME> is case-sensitive while <FIELD NAME> is
not.
`list(<CLASS NAME> = list(<FIELD NAME> = <FIELD VALUE>))`Suppose you want to add a new material to your model, which you can define using
EnergyPlus’s Material class. Figure 14.1 can be translated
to tell us that the Material class consists of the following fields
-
Nameis a required field of typealpha(i.e., a string) -
Roughnessis a required field of typechoiceand the possible choices areVeryRough,Rough,MediumRou.gh,MediumSmooth,Smooth, andVerySmooth. -
Thicknessis a required field with unit of measurement meters. It is arealnumber and must be \(>=0\) -
Conductivityis a required field with unit of measurement \(\mathrm{W}/\mathrm{m}\cdot\mathrm{K}\). It is arealnumber and must be \(>=0\) -
Densityis a required field with unit of measurement \(\mathrm{kg}/\mathrm{m}^3\). It is arealnumber and must be \(>=0\) -
Specific Heatis a required field with unit of measurement \(\mathrm{J}/\mathrm{kg}\cdot\mathrm{K}\). It is arealnumber and must be \(>=100\) -
Thermal Absorptanceis not a required field. It is arealnumber, has a default value of 0.9 if not specified, and must be between 0 and 0.99999. -
Solar Absorptanceis not a required field. It is arealnumber, has a default value of 0.7 if not specified, and must be between 0 and 0.99999. -
Visible Absorptanceis not a required field. It is arealnumber, has a default value of 0.7 if not specified, and must be between 0 and 0.99999.
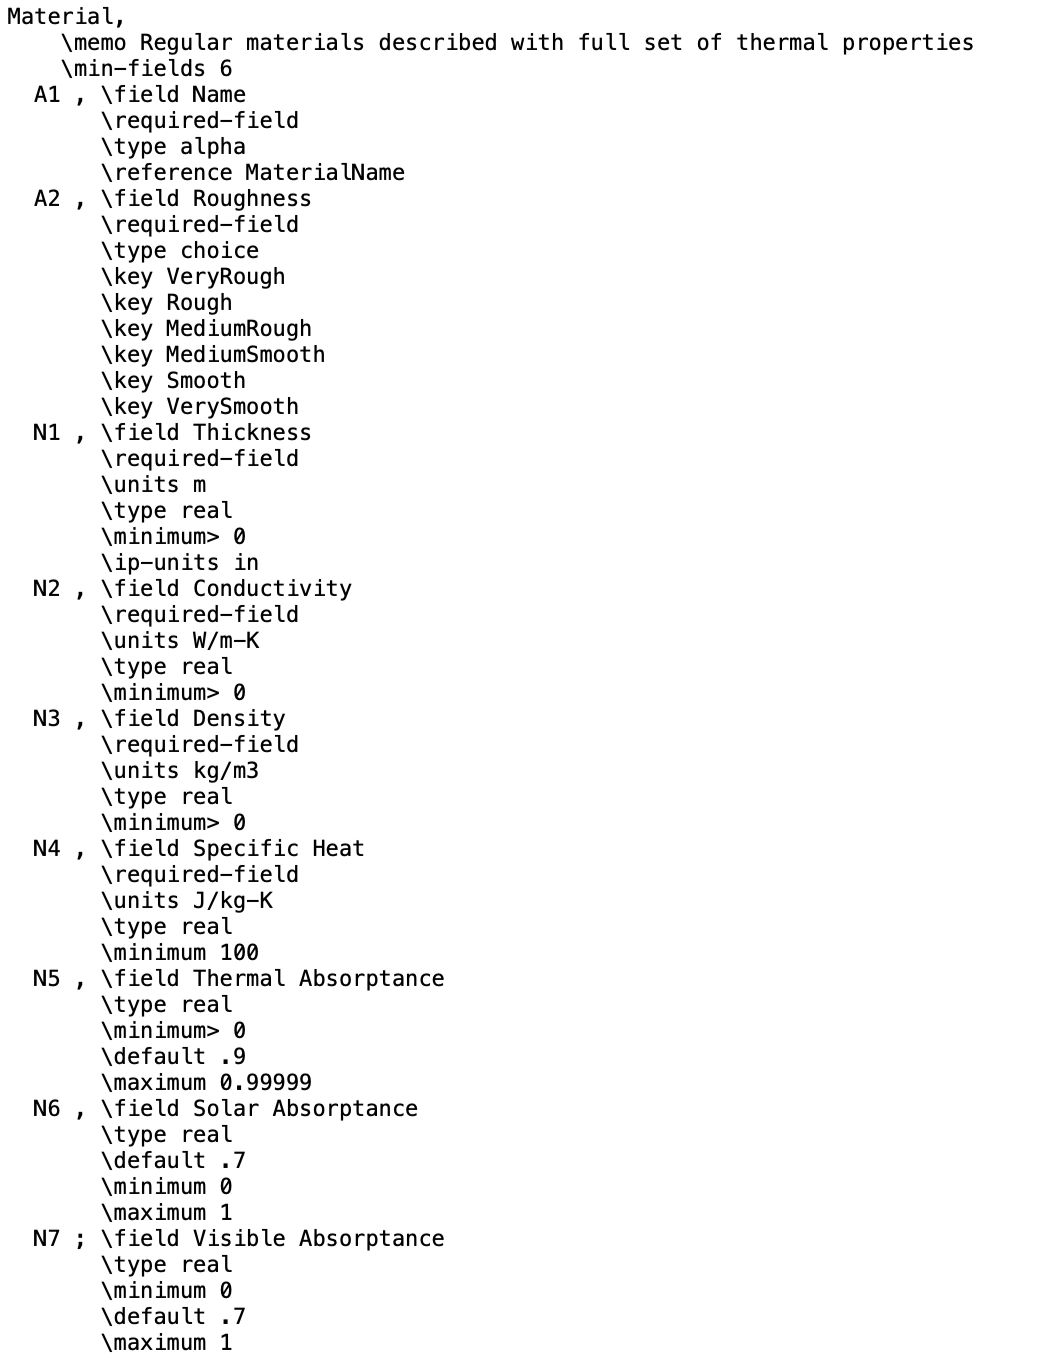
Figure 14.1: Definition of EnergyPlus Material class based on the IDD.
Based on the definitions provided in the IDD, you can define and add a new 100mm
brick object. By default, all empty fields will be filled with default values
specified in the IDD. As mentioned earlier, note that the class name (Material
in this example) is case-sensitive, while the field names (Name, Roughness,
Thickness, etc.) are case-insensitive.
new_mat <- list(
    Material = list(
        Name = "100mm brick",
        ROUGHness = "Rough",
        thickness = 0.10,
        conducTIVITY = 0.89,
        density = 1920,
        `Specific Heat` = 790
    ),
    Material = list(
        name = "spandrel glass",
        roughness = "smooth",
        thickness = 0.006,
        conductivity = 0.99,
        density = 2528,
        `Specific Heat` = 880
    )
)

model$add(new_mat)
## $`100mm brick`
## <IdfObject: 'Material'> [ID:682] `100mm brick`
## Class: <Material>
## ├─ 1*: "100mm brick", !- Name
## │─ 2*: "Rough",       !- Roughness
## │─ 3*: 0.1,           !- Thickness {m}
## │─ 4*: 0.89,          !- Conductivity {W/m-K}
## │─ 5*: 1920,          !- Density {kg/m3}
## └─ 6*: 790;           !- Specific Heat {J/kg-K}
##
....

model$objects(c("100mm brick", "spandrel glass"))
## $`100mm brick`
## <IdfObject: 'Material'> [ID:682] `100mm brick`
## Class: <Material>
## ├─ 1*: "100mm brick", !- Name
## │─ 2*: "Rough",       !- Roughness
## │─ 3*: 0.1,           !- Thickness {m}
## │─ 4*: 0.89,          !- Conductivity {W/m-K}
## │─ 5*: 1920,          !- Density {kg/m3}
## └─ 6*: 790;           !- Specific Heat {J/kg-K}
##
....
By default, all empty fields will be filled with default values specified in the
IDD and the object would be defined using only the minimum number of fields. You
change change this by setting with .default = FALSE (no default values used)
and .all = TRUE (all fields are added).