13 Model Input Structure
13.1 Prerequisites
In this chapter, we will use the eplusr package to extract various inputs in an EnergyPlus model, and through this, learn how the inputs in EnergyPlus are structured.
We will be working with the IDF and EPW file that pertains to the U.S. Department of Energy (DOE) Commercial Reference Building and Chicago’s TMY3 respectively.
13.2 EnergyPlus Documentation
Although the focus of this chapter is to elucidate how the model inputs are
structured to facilitate querying and modifying them, it is also important to
understand what each input means. Fortunately, EnergyPlus is well documented and
these documentation comes downloaded with any installation of EnergyPlus. You
will find these documents within EnergyPlus’s installation folder. By default,
EnergyPlus will be installed in C:\EnergyPlusVX-Y-0 on Windows,
/usr/local/EnergyPlus-X-Y-0 on Linux and /Applications/EnergyPlus-X-Y-0 on
macOS).
I would highly recommend referring to the EnergyPlus input output reference
([EnergyPlus installation folder] > Documentation > InputOutputReference.pdf),
which provides a thorough description of every field for every input object in
EnergyPlus.
For those who find that the input output reference does not satisfy your
inquisitive mind, I would recommend reading the EnergyPlus engineering reference
([EnergyPlus installation folder] > Documentation > EngineeringReference.pdf),
which provides insights into the theoretical basis behind various EnergyPlus
calculations.
13.3 EnergyPlus input structure
In EnergyPlus, the inputs to the model can be categorized hierarchically where the top level is known as the class groups (Figure 13.1). Each class group consists of multiple input classes that are identifiable by their class names. Each class is then defined by fields that may or may not be required. Required fields as it’s name suggest are field that must have a value. If the field is left blank and there are no pre-defined default values, an error will be raised when the simulation is run.
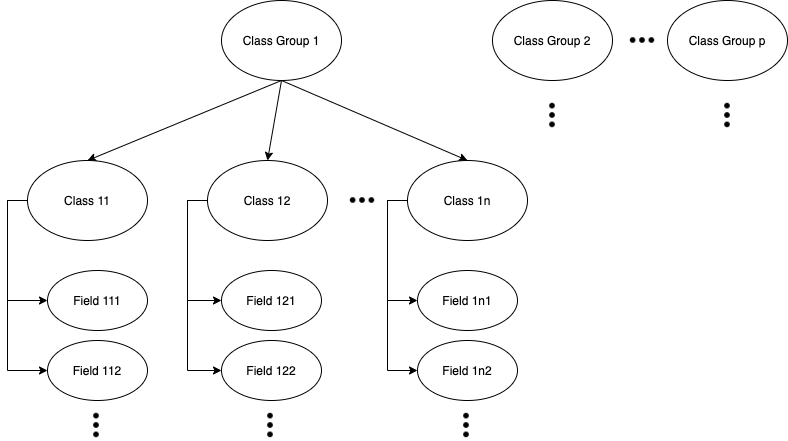
Figure 13.1: Hierarchical model inputs organizational structure.
Figure 13.2 illustrates this using the class group
Surface Construction Elements in EnergyPlus. The
Surface Construction Elements class groups consists of several classes that
include the Material:NoMass, Material:AirGap, and the
WindowMaterial:SimpleGalzingSystem class among others. Each class is then
defined by their respective fields. For example, the
WindowMaterial:SimpleGalzingSystem class is defined by a unique Name, the
U-Factor, SHGC or Solar Heat gain Coefficient, and the `Visible
Transmittance of the glazing system.

Figure 13.2: Categorization of EnergyPlus inputs
13.4 Class vs Object
In this book, we make a distinction between classes and objects following the terminologies of object-oriented programming (OOP). The difference between classes and objects is subtle yet conceptually simple. You can think of a class as a blueprint or template for creating objects. The created objects are therefore instances of the class. For example, when modeling glazing systems from the perspective of running an energy simulation, the thermal properties of the glazing system would be required for the calculations. Different glazing systems would have different thermal properties, which include the U-factor, solar heat gain coefficient (SHGC), and visible transmittance (\(T_{vis}\)). However, these properties although having different values, are a common characteristic across different glazing systems. Therefore, a glazing system class with the variables U-factor, SHGC, and \(T_{vis}\) can be used as a template to create various glazing objects.
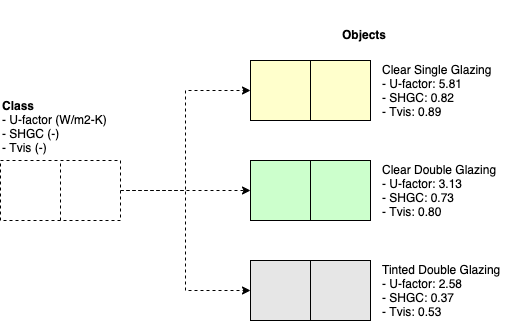
Figure 13.3: Figure shows how three different glazing objects can be created from a glazing class, which acts as the template.
13.5 Model Query
13.5.1 Idf class methods
Since the EnergyPlus model is organized hierarchically, we will demonstrate how
to query the model hierarchically using the methods in the Idf class.
Idf Class Method |
What it does |
|---|---|
$group_name() |
Query the names of class groups |
$class_name() |
Query the names of classes |
$object_name() |
Query the names of objects in one or more classes |
$objects() |
Query one or more objects using their names |
You can see what class groups exists in your model with the $group_name()
method
model$group_name()
##  [1] "Simulation Parameters"              "Location and Climate"
##  [3] "Schedules"                          "Surface Construction Elements"
##  [5] "Thermal Zones and Surfaces"         "Internal Gains"
##  [7] "Zone Airflow"                       "Exterior Equipment"
....
You can also view the list of classes in the model grouped by their corresponding class group.
model$class_name(by_group = TRUE)
## $`Simulation Parameters`
##  [1] "Version"                            "SimulationControl"
##  [3] "Building"                           "ShadowCalculation"
##  [5] "SurfaceConvectionAlgorithm:Inside"  "SurfaceConvectionAlgorithm:Outside"
##  [7] "HeatBalanceAlgorithm"               "ZoneAirHeatBalanceAlgorithm"
##  [9] "Timestep"                           "ConvergenceLimits"
##
## $`Location and Climate`
## [1] "Site:Location"
## [2] "SizingPeriod:DesignDay"
....
You can also view the list of objects that have been defined in a particular
class in the model using the $object_name() method. The example from the code
chunk below tells us that there are currently two materials (CP02 CARPET PAD
and MAT-AIR-WALL) that have been created using the Material:NoMass class.
You can think of these classes as templates for creating objects that defines
your model as explained in the previous sub-section. In this particular example,
the two material objects CP02 CARPET PAD and MAT-AIR-WALL are instances in
the model that have been defined based on the Material:NoMass class.
model$object_name("Material:NoMass")
## $`Material:NoMass`
## [1] "CP02 CARPET PAD" "MAT-AIR-WALL"
You can also query multiple classes.
model$object_name(c("Material", "Construction"))
## $Material
##  [1] "Steel Frame NonRes Wall Insulation" "IEAD NonRes Roof Insulation"
##  [3] "Std Wood 6inch"                     "Wood Siding"
##  [5] "1/2IN Gypsum"                       "1IN Stucco"
##  [7] "8IN CONCRETE HW"                    "Metal Siding"
##  [9] "HW CONCRETE"                        "Roof Membrane"
## [11] "Metal Decking"                      "Metal Roofing"
## [13] "MAT-CC05 4 HW CONCRETE"             "Std AC02"
##
## $Construction
....
Finally, you can also query individual objects using the $objects() method.
model$objects(c("Steel Frame Non-res Ext Wall", "IEAD Non-res Roof"))
## $`Steel Frame Non-res Ext Wall`
## <IdfObject: 'Construction'> [ID:37] `Steel Frame Non-res Ext Wall`
## ── COMMENTS ────────────────────────────────────────────────────────────────────
## ! ***OPAQUE CONSTRUCTIONS AND MATERIALS***
## ! Exterior Walls
## ── VALUES ──────────────────────────────────────────────────────────────────────
## Class: <Construction>
## ├─ 1*: "Steel Frame Non-res Ext Wall",  !- Name
## │─ 2*: "Wood Siding",      !- Outside Layer
## │─ 3 : "Steel Frame NonRes Wall Insulation",  !- Layer 2
....
13.5.2 $ operator
eplusr lets you to query model elements by names using the $ operator,
just like a normal named list in R. For instance, you can access the objects
defined using the Material:NoMass class with $Material:NoMass. Since class,
object, and field names in EnergyPlus often violets the variable naming
restrictions in R (e.g., containing special characters such as :, white
spaces, etc.), the identifiers need to be placed within a set of single back
quotes ` to tell R that this is a variable name.
With $`Material:NoMass` will list all the objects in the Material:NoMass
class.
model$`Material:NoMass`
## $`CP02 CARPET PAD`
## <IdfObject: 'Material:NoMass'> [ID:56] `CP02 CARPET PAD`
## Class: <Material:NoMass>
## ├─ 1*: "CP02 CARPET PAD", !- Name
## │─ 2*: "VeryRough",       !- Roughness
## │─ 3*: 0.2165,            !- Thermal Resistance {m2-K/W}
## │─ 4 : 0.9,               !- Thermal Absorptance
## │─ 5 : 0.7,               !- Solar Absorptance
## └─ 6 : 0.8;               !- Visible Absorptance
##
....
Since the model is stored hierarchically, you can chain them by adding another
$ to access and modify lower levels. Using the same example, you will be able
to retrieve the CP02 CARPET PAD object with
$`Material:NoMass`$`CP02 CARPET PAD`.
model$`Material:NoMass`$`CP02 CARPET PAD`
## <IdfObject: 'Material:NoMass'> [ID:56] `CP02 CARPET PAD`
## Class: <Material:NoMass>
## ├─ 1*: "CP02 CARPET PAD", !- Name
## │─ 2*: "VeryRough",       !- Roughness
## │─ 3*: 0.2165,            !- Thermal Resistance {m2-K/W}
## │─ 4 : 0.9,               !- Thermal Absorptance
## │─ 5 : 0.7,               !- Solar Absorptance
## └─ 6 : 0.8;               !- Visible Absorptance
Likewise, you could go further down the hierarchy and extract the value of a
particular field of an object by further chaining with another $. The example
below shows that the Thermal Resistance value of the CP02 CARPET PAD object
that was defined using the Material:NoMass class is 0.2165.
model$`Material:NoMass`$`CP02 CARPET PAD`$`Thermal Resistance`
## [1] 0.2165
You can use the definition method that returns the fields needed as inputs to
define a particular class.
Now, compare the output from the code chunk below with Figure
13.2. The required fields are indicated by eplusr
using an asterix *. Using the Material:NoMass class as an example (Figure
13.4), the same information can be obtained from the IDD file
(Energy+.idd) where the required fields are indicated with the
\required-field tag. The definitions of the different tags can be found at the
begining of the IDD file.
model$definition("Material:NoMass")
## <IddObject: 'Material:NoMass'>
## ── MEMO ────────────────────────────────────────────────────────────────────────
##   "Regular materials properties described whose principal description is R (Thermal Resistance)"
##
## ── PROPERTIES ──────────────────────────────────────────────────────────────────
##   * Group: 'Surface Construction Elements'
##   * Unique: FALSE
##   * Required: FALSE
##   * Total fields: 6
##
## ── FIELDS ──────────────────────────────────────────────────────────────────────
##   1*: Name
##   2*: Roughness
##   3*: Thermal Resistance
##   4 : Thermal Absorptance
##   5 : Solar Absorptance
##   6 : Visible Absorptance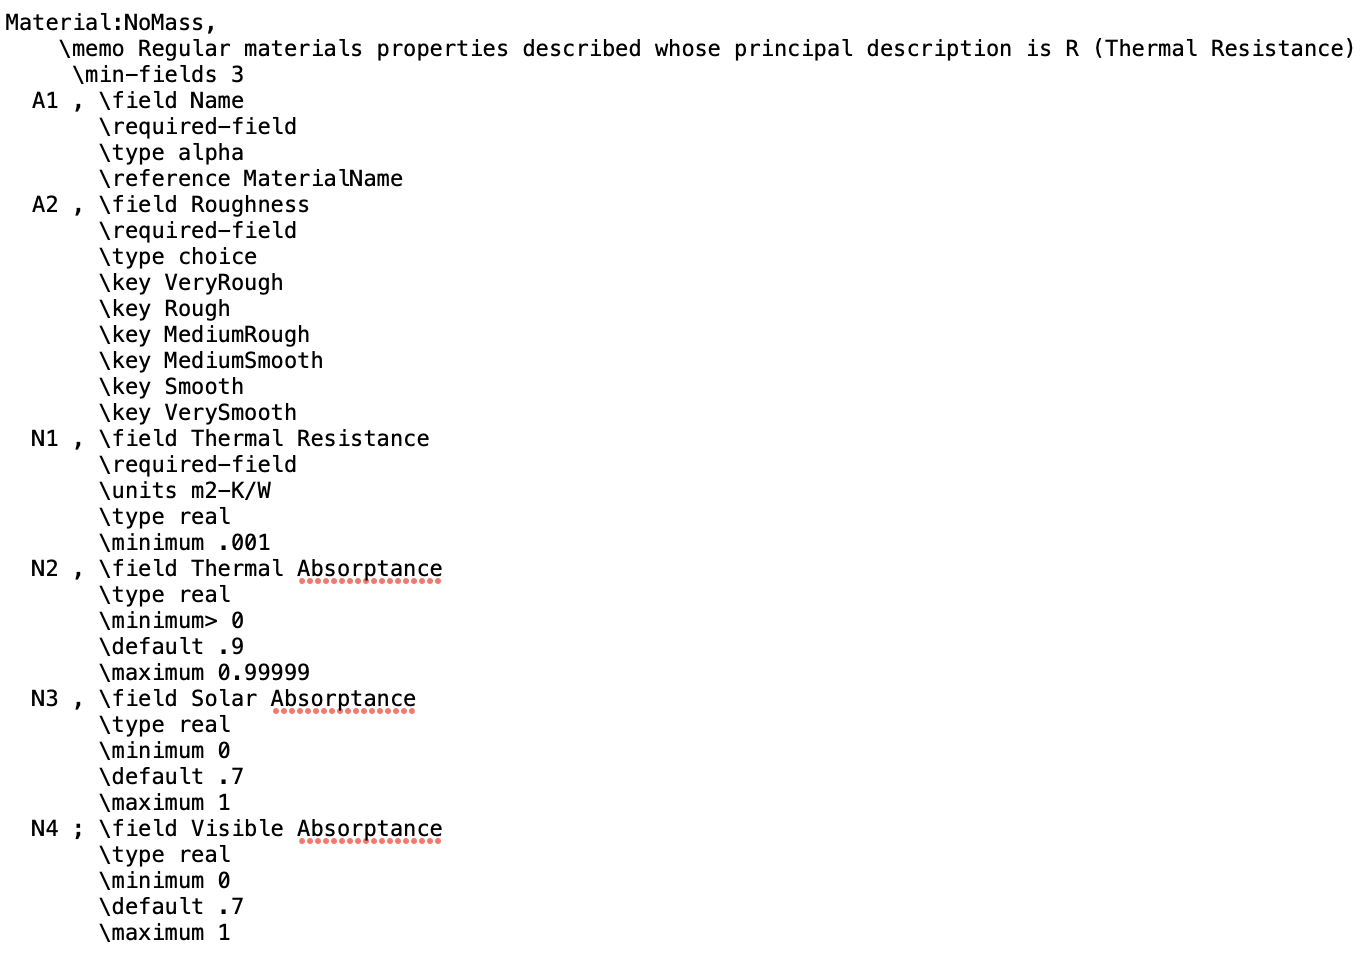
Figure 13.4: Screen capture of the definition of the Material:NoMass class from the EnergyPlus IDD file (Energy+.idd)
13.6 Object interdependencies
The inter-dependencies between different objects is a challenging aspect when working with energy models. It is important to note that changing an object not only affects the object but also the objects that reference it. A classic example is the relationship between the building’s thermal zones, surfaces, construction, and materials. A single building energy model comprises of one or more thermal zones and each thermal zone has it’s boundaries defined by several surfaces. Each surface is then assigned one construction where each layer of the construction is a material that is defined based on it’s thermal properties.
Using the construction Steel Frame Non-res Ext Wall as an example. You can see
that it references the materials Wood Siding,
Steel Frame NonRes Wall Insulation, and 1/2IN Gypsum. Likewise, it is
referenced by the surfaces Steel Frame Non-res Ext Wall,
Perimeter_bot_Plenum_Wall_North, …, Perimeter_top_ZN_4_Wall_West.
Therefore, changing the thermal properties of either of the three materials
Wood Siding, Steel Frame NonRes Wall Insulation, and 1/2IN Gypsum would
change the thermal properties of the Steel Frame Non-res Ext Wall Construction
and subsequently all the surfaces that references it. On a different note,
changing an object’s name would also require updating all the fields in the
model that references the object. In this example, changing
Steel Frame Non-res Ext Wall to Steel Frame Non-res Wall would require
updating all the Construction Name field in the surfaces that references it,
otherwise, a severe error would be raised when the simulation is run.
model$object_relation("Steel Frame Non-res Ext Wall")
## ── Refer to Others ─────────────────────────────────────────────────────────────
##  Class: <Construction>
##  └─ Object [ID:37] <Steel Frame Non-res Ext Wall>
##     ├─ 2: "Wood Siding", !- Outside Layer
##     │  v~~~~~~~~~~~~~~~~~~~~~~~~~~~~~~~~~
##     │  └─ Class: <Material>
##     │     └─ Object [ID:50] <Wood Siding>
##     │        └─ 1: "Wood Siding"; !- Name
##     │
##     ├─ 3: "Steel Frame NonRes Wall Insulation",  !- Layer 2
....
In EnergyPlus, each object may be referenced by other
model$object_relation("Window Non-res Fixed")
## ── Refer to Others ─────────────────────────────────────────────────────────────
##  Class: <Construction>
##  └─ Object [ID:45] <Window Non-res Fixed>
##      └─ 2: "NonRes Fixed Assembly Window";  !- Outside Layer
##         v~~~~~~~~~~~~~~~~~~~~~~~~~~~~~~~~~~~~~~~~~~~~~~~~~~~
##         └─ Class: <WindowMaterial:SimpleGlazingSystem>
##            └─ Object [ID:46] <NonRes Fixed Assembly Window>
##               └─ 1: "NonRes Fixed Assembly Window";  !- Name
##
##
....